How segment create on Mailchimp
Mailchimp is an excellent tool if you want to start with email or newsletter marketing. You can create automated flows and strategize everything on this platform itself. Mailchimp allows you to segment your audience based on various criteria, such as subscriber information, engagement behavior, purchase history, and more. Segmentation helps you send targeted and relevant content to specific groups of subscribers.
What are Segments?
Segments are dynamic subsets of your entire Mailchimp audience. You create them based on specific criteria, such as demographics, interests, purchase history, or website behavior. Each segment represents a group of subscribers with shared characteristics or actions.
Benefits of segmentation
A. Increased relevancy
Imagine getting a ton of unrelated stuff in an email. It hits the trash can with a thump as it settles in your inbox. This situation is eliminated via segmentation. Emails become more customized when the content is tailored to each segment’s requirements and interests.
1. Speak their language
Using segmentation, a Mailchimp campaign manager can put subscribers into groups according to their demographics, prior purchases, online activity, or hobbies discovered from previous email exchanges. This lets you create content that specifically addresses their needs, wants, and pain spots. For example, you can send emails showcasing new arrivals in the sports apparel area to subscribers in your section who have already purchased such items.
2. Context is king
Suppose you email subscribers who mostly buy work clothes about a new range of sporting apparel. It would not strike a chord. By using segmentation, you can customize the email context and ensure that each section receives content relevant to their prior behavior and interests. Also, you can launch a re-engagement campaign with a discount coupon or unique content to tempt subscribers who haven’t read emails in the last three months.
3. Boosting engagement
Subscribers are more inclined to open, read, and interact with emails when they believe the content is relevant and important. As a result, your CTAs will have greater click-through rates, which will move prospects along the sales funnel. For example, a segment of subscribers who are interested in healthy recipes may be more inclined to click on a link to a recent blog post with suggestions for nutritious meals.
B. Improved open rates
Open rates are the lifeblood of email marketing. They represent the percentage of subscribers who open your emails. Segmentation plays a crucial role in improving this vital metric:
1. Cutting through the clutter
Inboxes are overflowing with emails. A segment in Mailchimp ensures your emails stand out from the generic noise. By receiving content tailored to their interests, subscribers are more likely to prioritize your emails and give them their undivided attention. For example, suppose you segment subscribers who have expressed interest in a new product launch and send them a targeted email about it. In that case, they’re more likely to open it compared to a generic launch announcement sent to your entire audience.
2. Building anticipation
When subscribers know your emails will offer relevant and valuable content, they’ll develop a sense of anticipation. This anticipation motivates them to open your emails and see what’s in store, increasing your open rates. Suppose you segment subscribers who have abandoned their carts and send them a targeted email reminding them of the items left behind with a discount code. In that case, they’re more likely to open it compared to a generic abandoned cart email.
3. Building trust and loyalty
Segmentation demonstrates that you value your subscribers’ time and attention. You build trust and loyalty by consistently delivering relevant content, and encouraging subscribers to open your emails and engage with your brand. Suppose you segment subscribers who have been loyal customers for a year and send them a targeted email with a special anniversary discount or early access to a new sale. In that case, they’re more likely to appreciate the gesture and feel valued.
C. Enhanced click-through rates
The bottom line of email marketing is to drive action. Segmentation empowers you to craft targeted CTAs (calls to action) that resonate deeply with each segment:
1. Laser-focused CTAs
With a clear understanding of each segment’s needs and interests, you can tailor your CTAs to align perfectly. This could involve a discount code for a specific product category relevant to a particular segment, a registration link for a relevant webinar, or an invitation to download a helpful resource. For example, if you segment subscribers interested in fitness and email them a new workout video, your CTA could be to “Watch the video now!”
2. Overcoming objections
Segmentation in the Mailchimp campaign allows you to anticipate potential objections within each segment. By addressing these objections within your email content and crafting CTAs that directly address them, you overcome hurdles and increase the likelihood of click-throughs. Suppose you segment subscribers who haven’t purchased a new product yet and send them an email highlighting its benefits. In that case, you can address potential objections like price or features within the email and have your CTA be “Learn more about the benefits!”
3. Optimizing for conversions
By segmenting and tailoring your CTAs, you ensure each email campaign is optimized for conversions within that specific audience group. This targeted approach significantly improves your click-through rates, driving more subscribers toward your desired outcome. For example, if you segment subscribers who have previously purchased a specific product line and send them an email with new accessories that complement their purchase, your CTA could be “Shop new accessories now!” This targeted approach is more likely to lead to conversions compared to a generic email promoting all your new accessories to your entire audience.
D. Boosted ROI
Email marketing provides great Returns On Investment (ROI) within the marketing landscape. Segmentation takes this ROI to the next level:
1. Smarter spending
Generic email campaigns often involve a “spray and pray” approach, sending the same message to everyone. Segmentation allows you to focus your resources on targeted campaigns with a higher likelihood of success. This translates to a more efficient use of your marketing budget. For example, instead of sending a generic discount code to your entire audience, you can segment subscribers who haven’t purchased in a while and send them a targeted email with a higher discount offer to entice them back. This approach is more likely to yield conversions compared to a generic discount sent to everyone.
2. Increased sales and conversions
By delivering highly relevant content that relates with specific audience segments, you’re more likely to convert them into paying customers. This translates to a direct boost in your sales and overall ROI from email marketing efforts. For example, you segment subscribers who have shown interest in a specific product category through website behavior and send them a targeted email highlighting the product’s benefits and offering a limited-time sale. In that case, you’re more likely to drive sales compared to a generic email about the product sent to your entire audience. You can also use Mailchimp campaign automation in such cases.
3. Reduced waste
Segmentation helps you eliminate wasted resources spent on irrelevant emails that subscribers simply won’t engage with. This translates to a more efficient email marketing operation and a maximized return on investment. For example, by segmenting out subscribers who have unsubscribed from promotional emails and only sending them informative content updates, you’re not wasting resources on sending them emails they won’t open or appreciate.
E. Reduced unsubscribes
Nobody enjoys feeling bombarded with irrelevant emails. Segmentation helps you avoid this pitfall and keep your subscribers engaged:
1. Unsubscribe prevention
When subscribers consistently receive emails that resonate with their needs and interests, they’re far less likely to hit the “unsubscribe” button. Segmentation fosters a sense of value and keeps subscribers engaged with your brand. For example, you segment subscribers who have expressed interest in a particular topic and send them targeted emails with relevant content about that topic. In that case, they’re more likely to stay subscribed compared to receiving generic emails that don’t align with their interests.
2. Building loyalty
Targeted emails demonstrate that you care about your subscribers’ preferences. This fosters loyalty and encourages subscribers to stick around for the long haul, nurturing valuable customer relationships over time. For example, you segment subscribers who have been loyal customers for a certain period and send them a targeted email with a personalized thank you message and exclusive offers. Hence, they’re more likely to feel valued and appreciate your brand.
3. Permission-based marketing
Segmentation in Mailchimp campaigns reinforces a permission-based approach to email marketing. By delivering content subscribers explicitly opted-in to receive, you build trust and respect, reducing unsubscribe rates. For example, if you allow subscribers to choose their areas of interest during signup and then segment them based on those preferences, you’re sending them content they signed up for, fostering trust and reducing the likelihood of them unsubscribing.
How to craft effective segments in Mailchimp?
1. Accessing the Segment Builder
- Log in to your Mailchimp account and go to the “Audience” section.
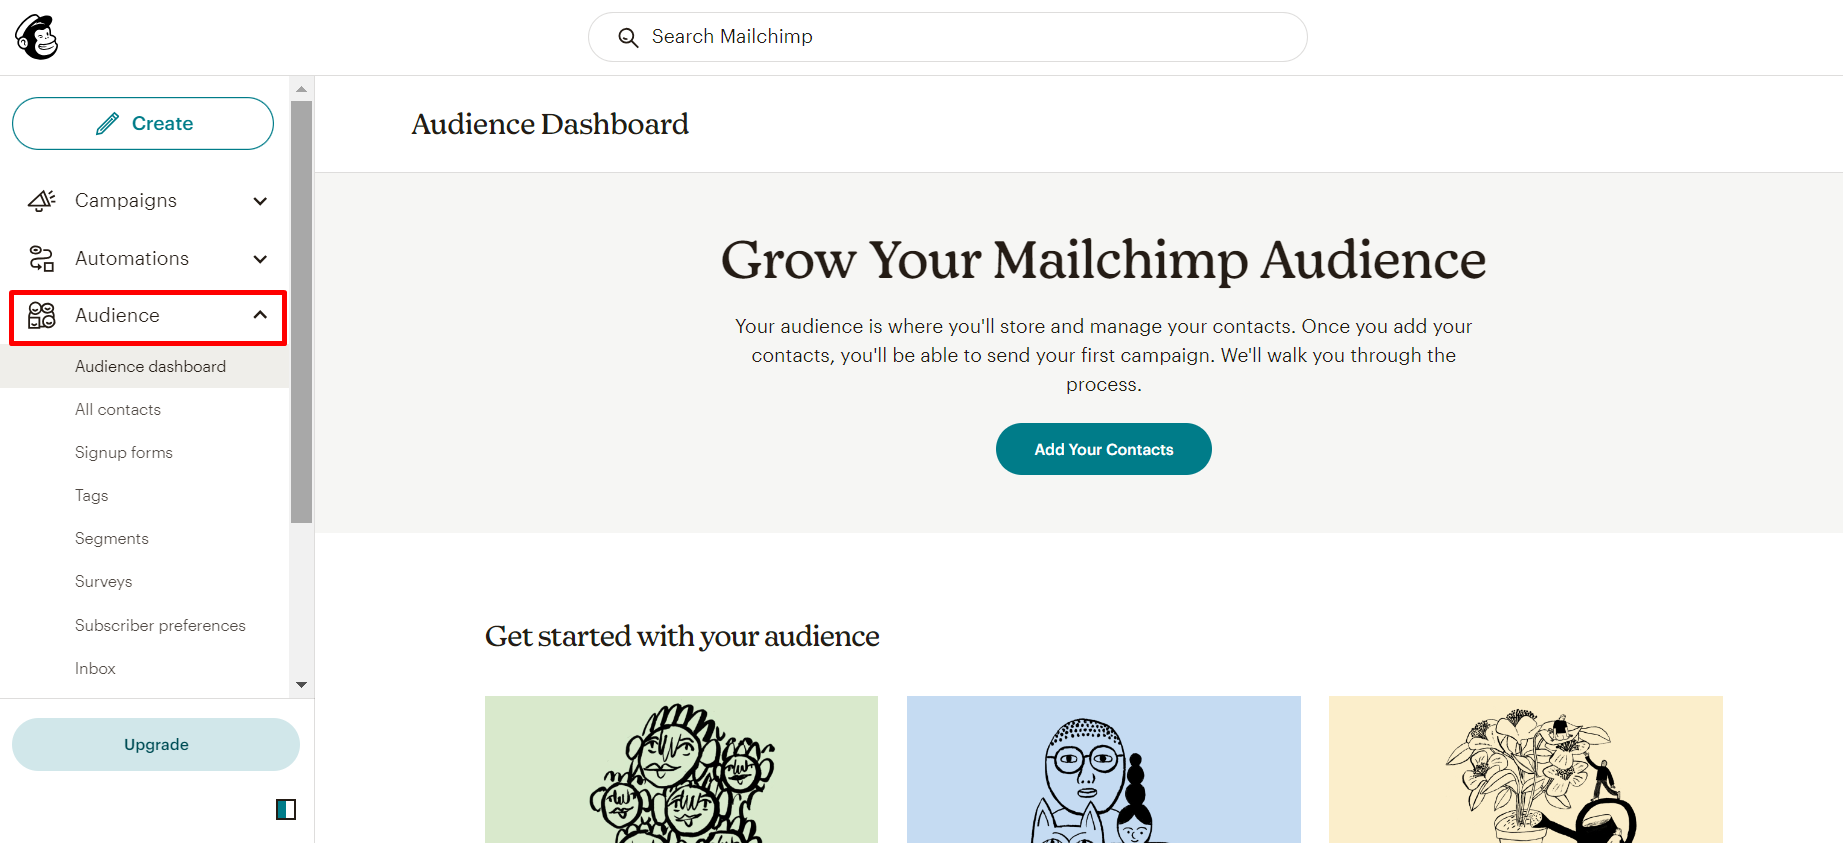
- Click on “Segments” in the left-hand navigation menu.
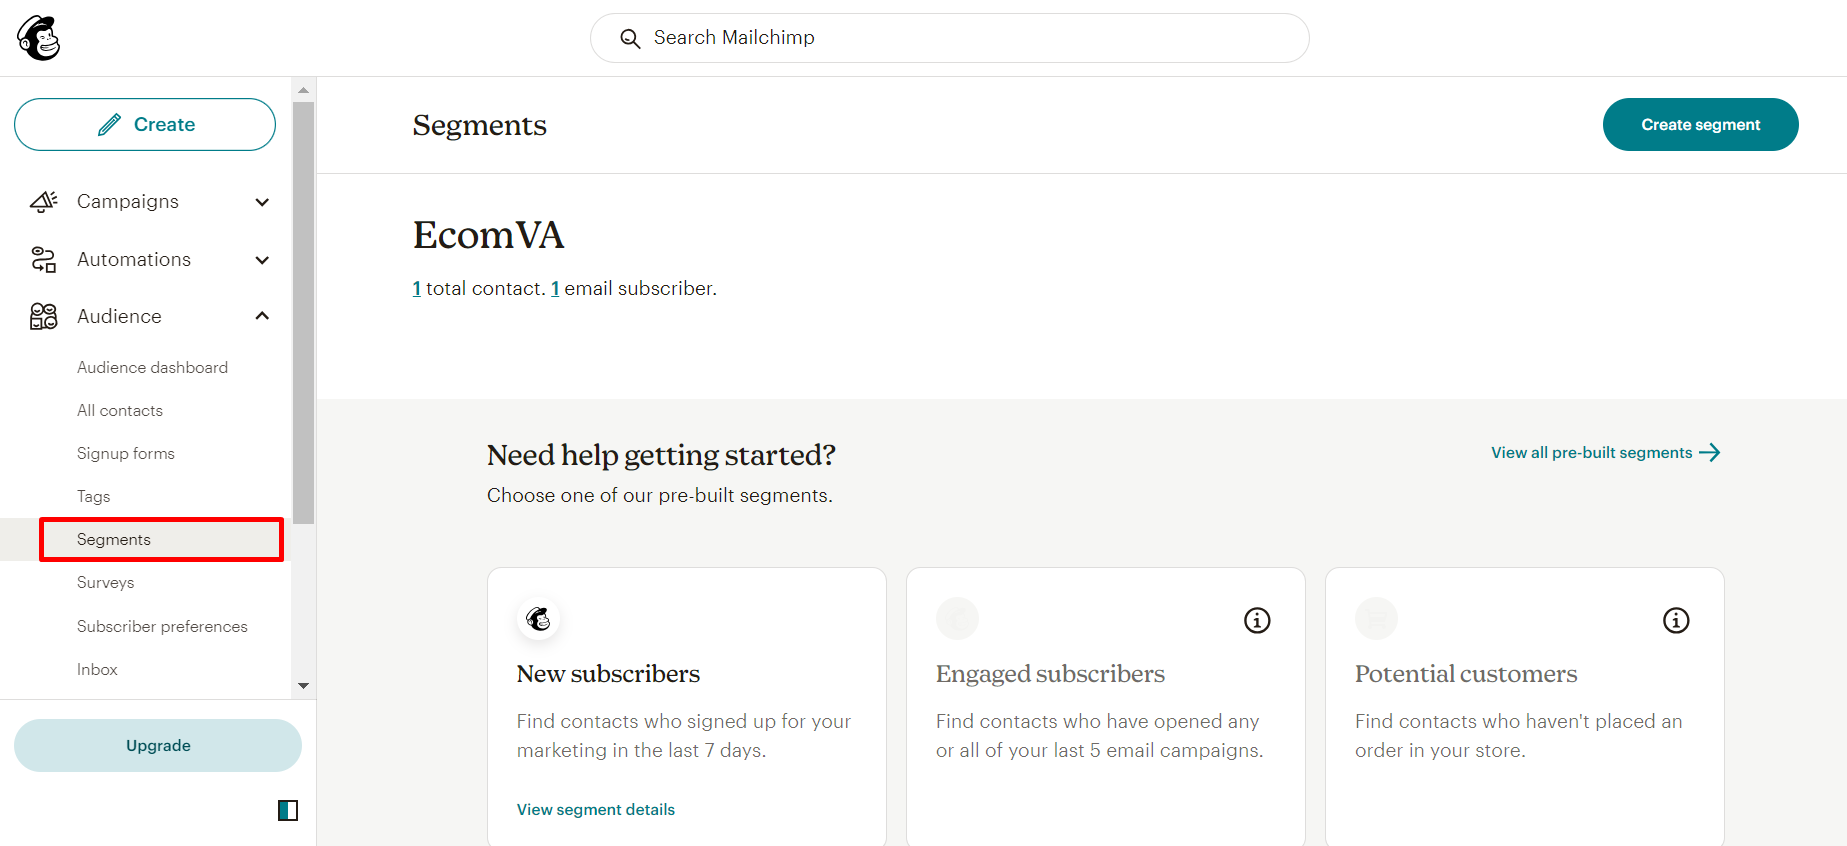
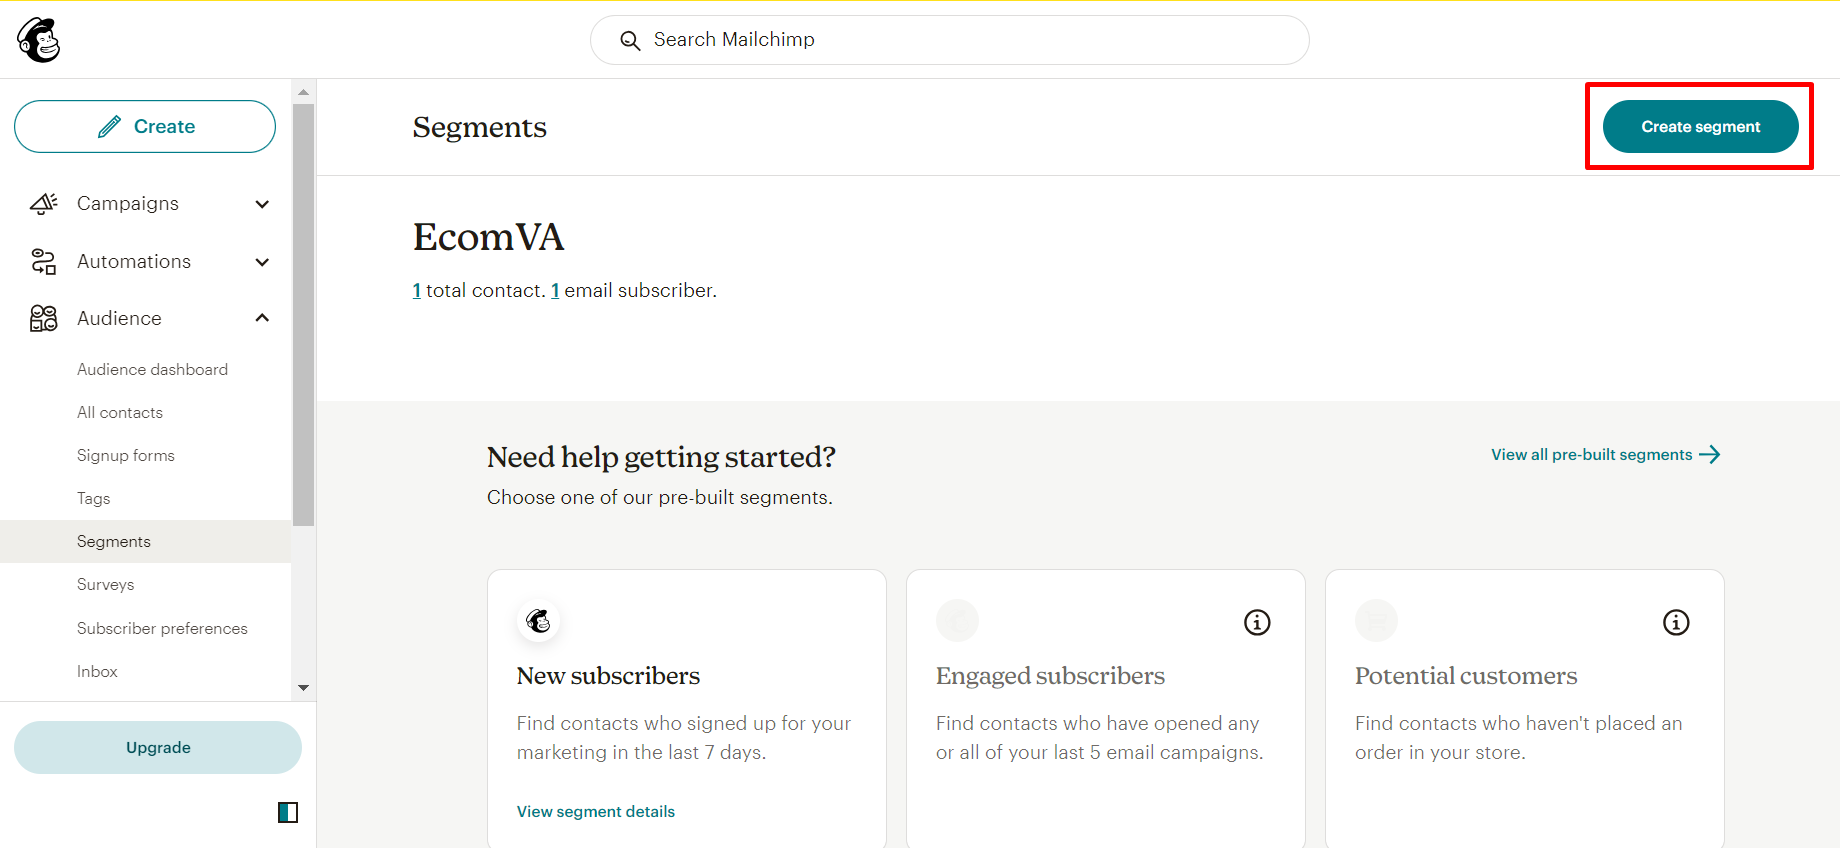
- Select “Create a new segment” on the right side of the page.
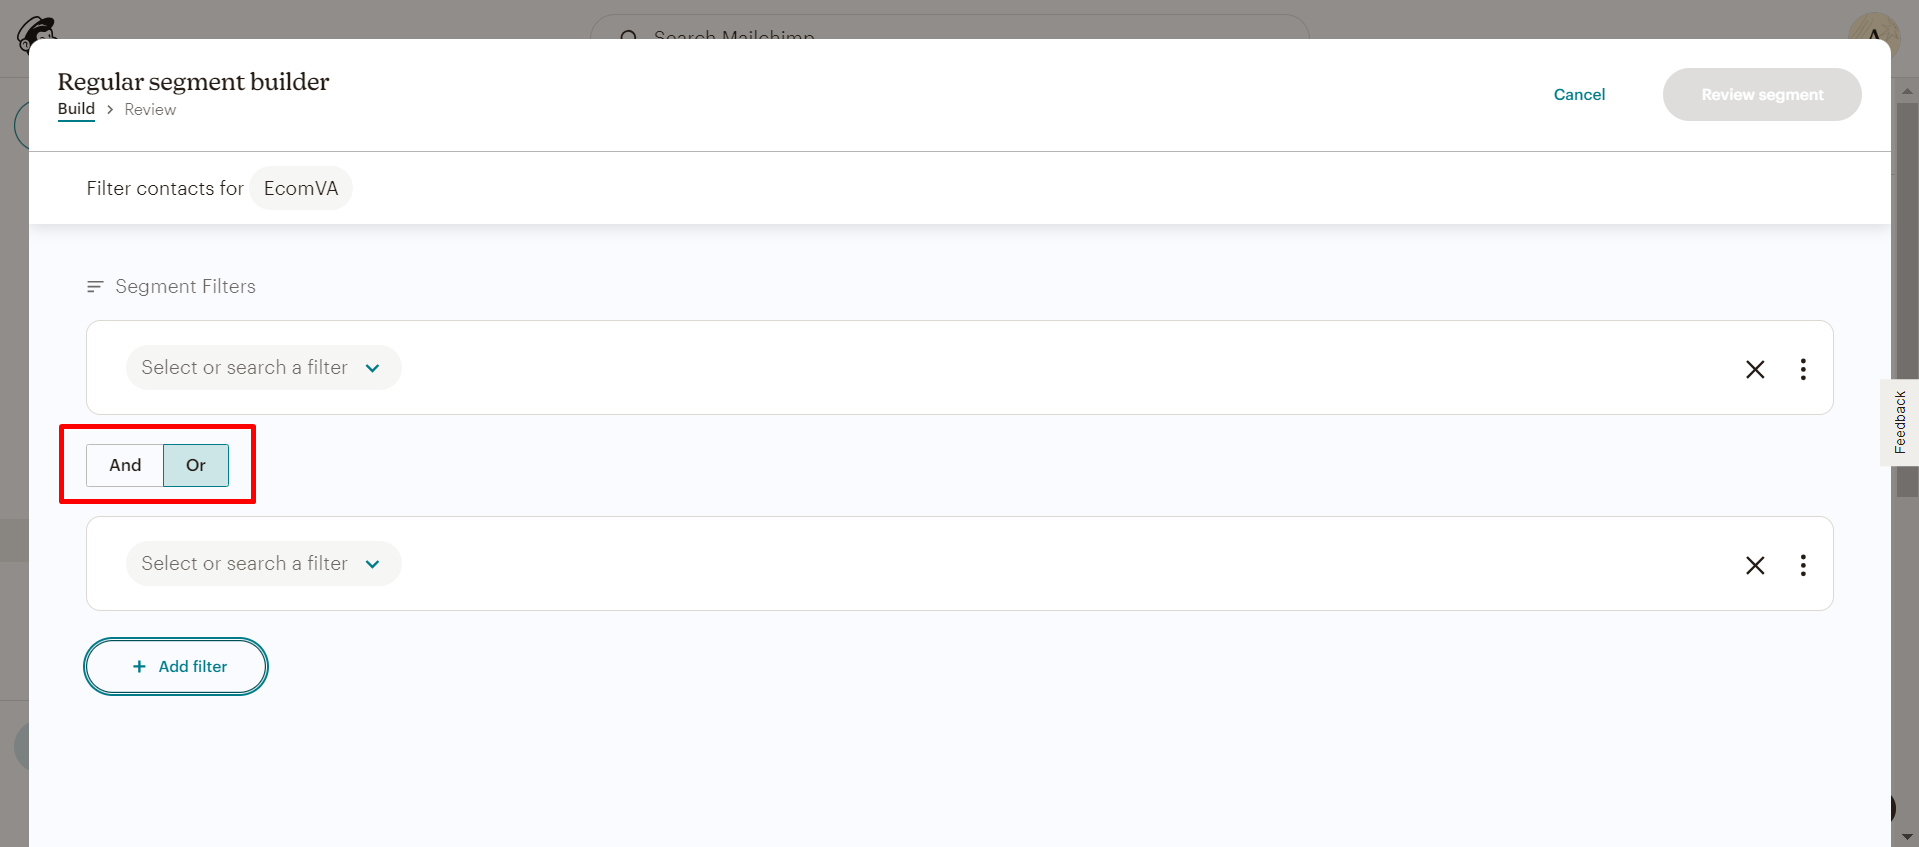
2. Defining Your Segment Logic
- Choose the logic for your segment: “And” or “Or.”
- And: Target subscribers who meet all the criteria you define (e.g., female subscribers aged 25-35 who have also purchased workwear).
- Or: Target subscribers who meet at least one of the criteria you define (e.g., subscribers who have opened any email in the past month or clicked on a link within a recent email).
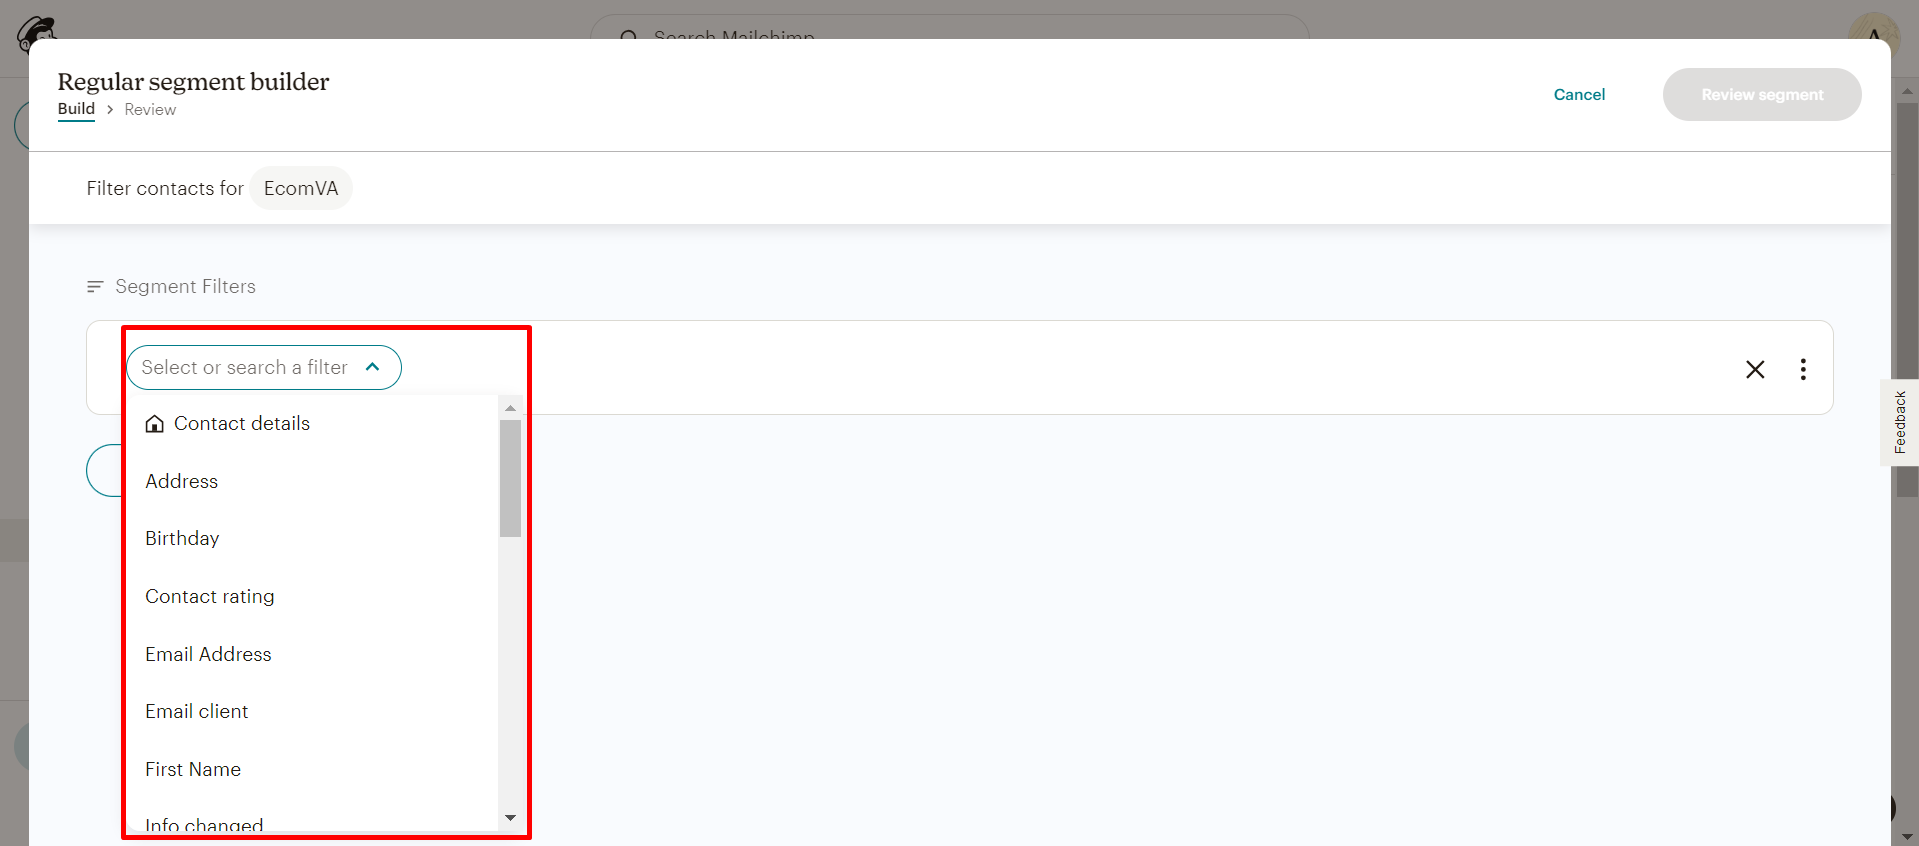
3. Adding Segment Criteria
- Click on “Add a filter” to define the characteristics you’ll use to target your segment.
- Choose a category for your filter (e.g., Subscriber Information, Campaign Activity, E-commerce Activity, Merge Tags).
- Select the specific criteria within the chosen category (e.g., gender, opens in the past month, purchase amount, birthday).
- You can add multiple filters (up to 5 in free plans) to create more complex segments based on various criteria.
4. Refining Your Segment (Optional)
- Utilize the “Exclude” option to refine your segment further. This allows you to remove specific groups of subscribers who meet certain criteria from your broader segment.
- For example, you might exclude recent purchasers from a win-back campaign targeting inactive subscribers.
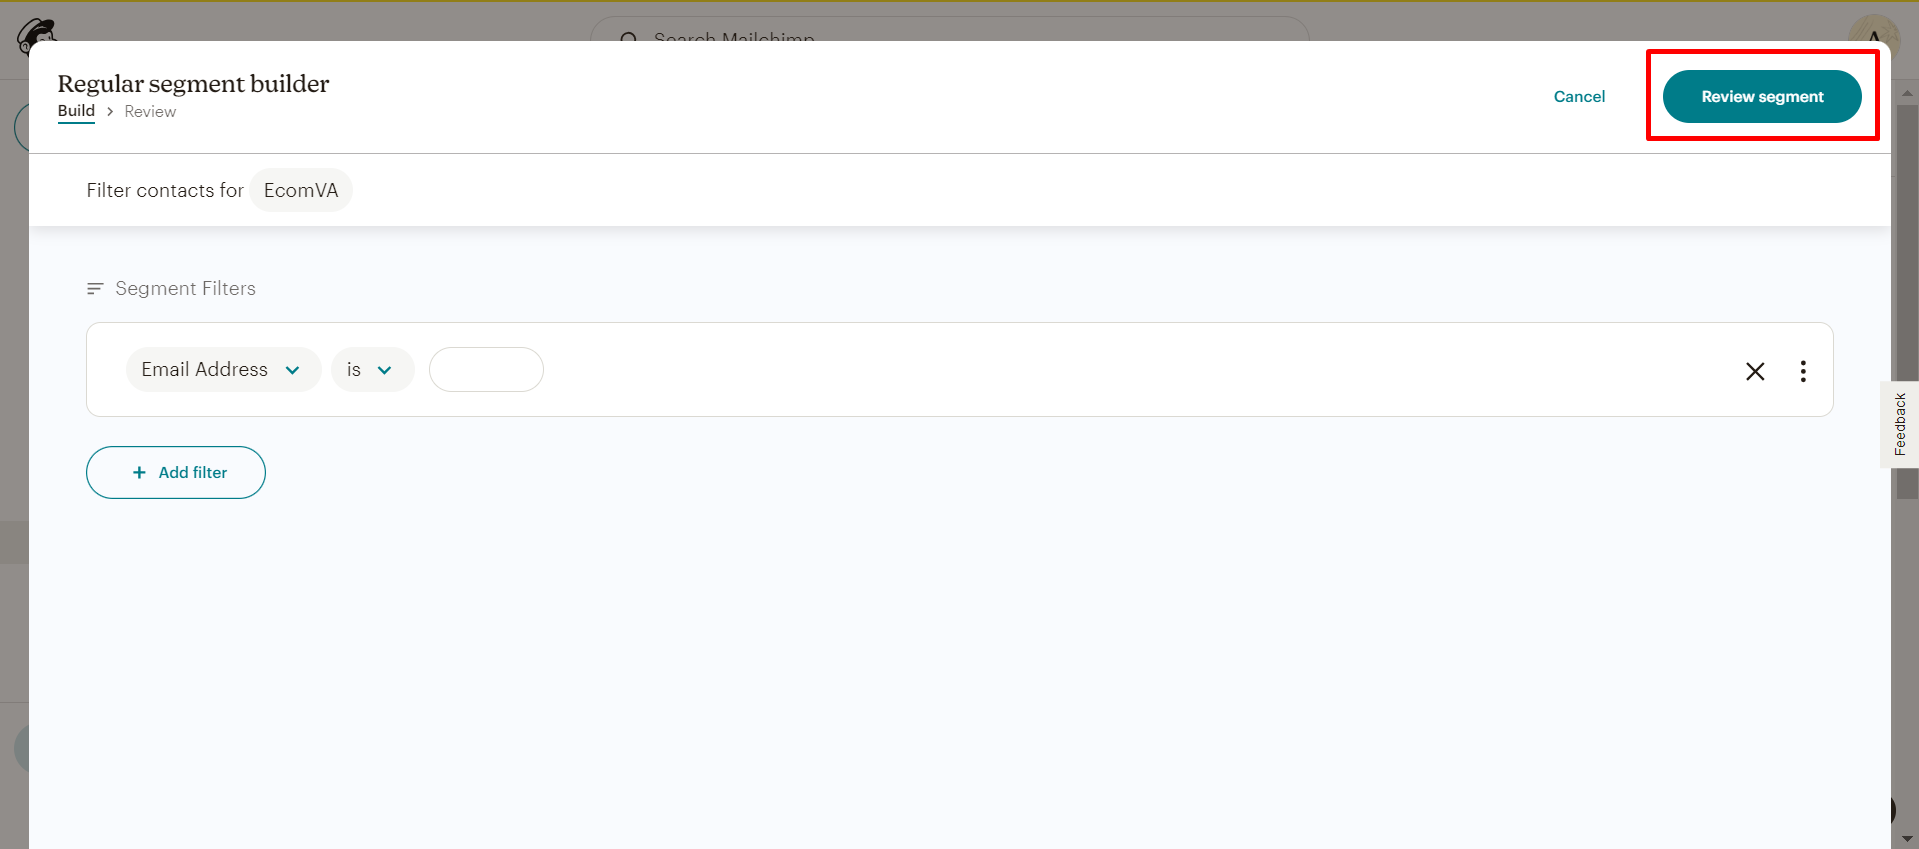
5. Reviewing and Saving Your Segment
- Once you’ve defined your segment criteria, click on “Review Segment” to see an estimated size of the targeted audience.
- Mailchimp displays a notification if you’ve exceeded the filter limit for your account (5 filters in free plans).
- If satisfied, click on “Save Segment” to add it to your Mailchimp audience for future use.
Keep in mind that Mailchimp’s user interface and features may have changed since my last update. Therefore, referring to the latest Mailchimp documentation or resources is a good idea for the most accurate and up-to-date instructions on creating segments.
Hire An E-Commerce Virtual Assistant!
Finally Get A Dedicated Ecommerce Virtual Assistant To Conduct Your Task In The Best Possible Manner